Choosing the right Drywall Sanding Pads can change the quality, speed, and cleanliness of a finishing project. A pad that feels smooth may remove too little compound. A rougher surface may leave visible scratches near seams or corners. This 2026 buying guide examines grit, abrasive materials, backing strength, hole patterns, and compatibility with hand sanders or pole tools. It also considers how each pad performs on joint compound, patched surfaces, and painted drywall.
Real work reveals the difference.
The evaluation focuses on practical details, not impressive packaging. A reliable pad should stay flat, resist clogging, and remain comfortable during long overhead sessions. Dust extraction matters, especially when sanding a ceiling in a small room. Manufacturer specifications provide a useful starting point, while hands-on testing exposes weaknesses that product descriptions often miss. Pad life, edge durability, and cleaning methods will also receive attention. Some premium options may last longer, but price alone does not prove better value. That assumption needs questioning. A budget pad can perform well on soft compound, yet fail quickly against hardened patches. Conversely, an aggressive pad may save time and create extra repair work. The guide weighs these trade-offs carefully, helping professionals, renovators, and careful beginners make a more informed purchase. Expect clear comparisons, realistic limitations, and recommendations based on surface condition rather than marketing claims.
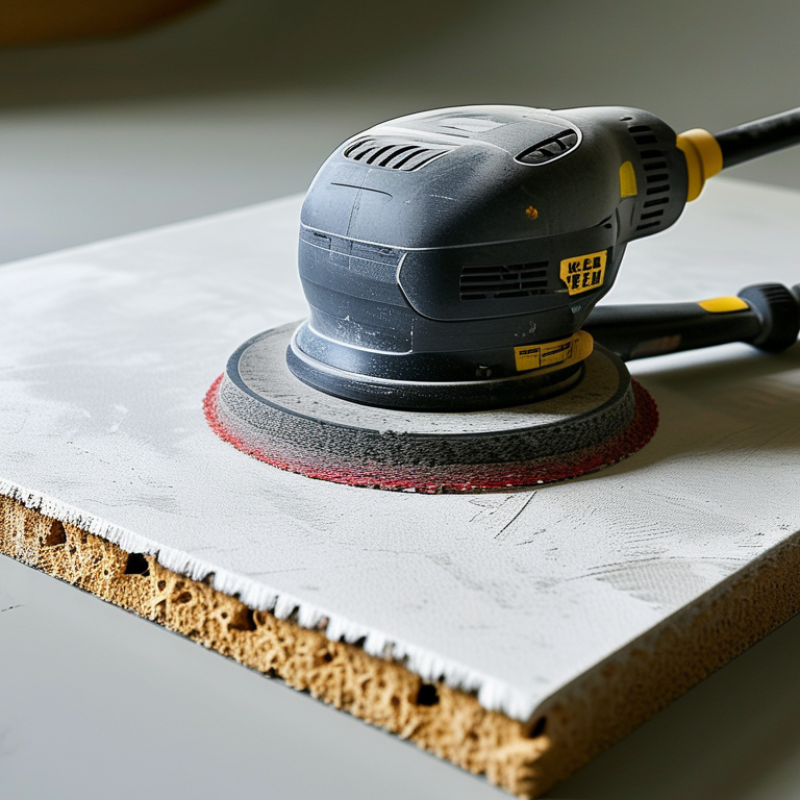
Drywall sanding pads are abrasive tools designed to smooth joint compound, patching material, and uneven wall surfaces. They usually contain a foam, mesh, or paper backing with abrasive particles fixed to one side. The pad removes raised edges without cutting deeply into the drywall paper.
They work through controlled friction. As you move the pad across a repaired area, abrasive grains shave down high spots and blend the compound into the surrounding surface. A fine grit helps create a smooth finish, while a coarser grit removes heavier ridges faster. Use light pressure and steady strokes. Let the abrasive do the work.
Dust matters. Many pads include open mesh, allowing sanding dust to pass through instead of clogging the surface. Some can connect with a vacuum system, which keeps the room cleaner and improves visibility. I once pressed too hard near a patch and exposed the drywall paper. That shortcut was wrong. A softer touch would have saved time.
Choose the pad by grit, backing flexibility, and intended task. A flexible pad follows slight wall curves, while a rigid pad helps flatten broad, uneven areas. Check the abrasive surface before each use. A clogged or worn pad can drag, scratch, and produce misleading results. Wear eye protection and a suitable dust mask, especially during extended sanding. Test a small section first, because compound hardness and wall condition can vary more than expected.

In 2026, drywall sanding pads are available in several practical forms. Abrasive mesh sheets are popular because dust passes through their open structure. Paper-backed sheets provide a smoother feel but clog faster on soft joint compound. Foam sanding pads work well around corners, screw heads, and curved repairs. For larger walls, pole-mounted sanding screens reduce bending and improve reach. Vacuum-compatible discs are also expanding, especially for contractors managing airborne dust.
Grit selection remains important. Coarse 80–100 grit removes ridges and heavy overlaps. Medium 120–150 grit levels dried compound. Fine 180–220 grit prepares surfaces for paint. The U.S. Geological Survey reported roughly 20 million metric tons of domestic gypsum production in 2024, showing the continued scale of gypsum-based construction materials. However, pad performance depends more on compound hardness, pressure, and dust control than grit alone. I have found that pressing harder often creates grooves, not faster results.
Tips: Keep two pads nearby. Use coarse mesh only where needed, then change to fine grit. Check the surface under side lighting. OSHA’s respirable crystalline silica standard sets a 50 microgram-per-cubic-meter exposure limit over eight hours, so use ventilation, a suitable respirator, and vacuum extraction when compound ingredients may contain silica. The wrong pad can waste time. Test a small area first.
Which Types of Drywall Sanding Pads Are Available in 2026?
| Pad Type | Abrasive Material | Backing or Structure | Common Grit Range | Best Applications | Dust-Collection Performance | Wet/Dry Use | Main Buying Consideration |
|---|---|---|---|---|---|---|---|
| Abrasive Mesh Pads | Aluminum oxide or silicon carbide abrasive bonded to an open mesh. | Flexible woven or perforated mesh that allows dust to pass through. | Usually available from coarse grits around 60–80 to fine grits around 220. |
|
Very good when used with a vacuum-compatible sanding head; the open structure helps reduce clogging. | Usually dry; some silicon-carbide versions may be rated for wet use. | Check hole pattern, pad dimensions, and compatibility with the sanding tool. |
| Perforated Abrasive Sheets | Typically aluminum oxide or silicon carbide. | Paper or film sheet with punched holes for dust extraction. | Commonly available in coarse, medium, and fine grades such as 80, 120, 150, 180, and 220. |
|
Good to excellent when the perforations align with the sander's extraction holes. | Primarily dry use. | Choose the correct hole layout and attachment system to maintain airflow. |
| Non-Perforated Sandpaper Sheets | Most commonly aluminum oxide; silicon carbide is also used for some applications. | Coated paper backing without extraction holes. | Commonly available from approximately 60 to 220 grit. |
|
Limited; dust remains on the surface and can clog the abrasive more quickly. | Usually dry; follow the product's wet-use instructions. | Economical for occasional work, but it may wear faster on rough joint compound. |
| Abrasive Film Pads | Aluminum oxide, ceramic abrasive, or other engineered abrasive grains. | Thin polymer film backing with a more uniform surface than ordinary paper. | Often offered in medium to fine grades, including approximately 120–320. |
|
Good when perforated; moderate when non-perforated. | Many are dry-use products; wet suitability depends on the specific construction. | Useful when a consistent finish and resistance to tearing are more important than low cost. |
| Drywall Sanding Sponges | Aluminum oxide or silicon carbide abrasive particles bonded to foam. | Flexible foam body, often with one coarse side and one fine side. | Commonly labeled coarse, medium, fine, or extra fine rather than by a single standardized grit. |
|
Low for vacuum extraction, but the foam can capture some loose dust during hand use. | Many are washable and suitable for damp sanding; verify the label before wet use. | Look for a firm but flexible foam that conforms to corners without rounding them excessively. |
| Detail and Corner Sanding Pads | Usually aluminum oxide or silicon carbide. | Small rectangular, pointed, or shaped pad designed for controlled hand sanding. | Commonly available in medium to fine grades, approximately 100–220. |
|
Limited unless designed with extraction openings. | Typically dry; some sponge-style products can be used damp. | Prioritize shape, edge control, and comfort over maximum sanding speed. |
| Pole-Sander Replacement Pads | Mesh, perforated paper, or perforated film abrasive. | Hook-and-loop, clamp-on, or tool-specific attachment backing. | Commonly selected in 80–220 grit for progressive drywall finishing. |
|
Good to excellent when the pad matches the pole sander's extraction system. | Generally dry use. | Confirm pad size, attachment method, flexibility, and vacuum-port alignment. |
| Fine-Finish Sanding Pads | Fine aluminum oxide, silicon carbide, or engineered abrasive grain. | Mesh, film, paper, or foam backing depending on the product. | Often approximately 180–320; higher grades may be available for specific finishing tasks. |
|
Varies by backing; perforated mesh and film generally perform better with extraction. | Usually dry; use damp sanding only when expressly permitted. | Use light pressure to avoid polishing the compound or creating shallow depressions. |
2026 Top Drywall Sanding Pads Buying Guide
Choosing the right drywall sanding pad starts with the surface, not the package label. For fresh joint compound, a 100- to 150-grit pad usually removes ridges without digging deep grooves. Use a 180- to 220-grit pad for final smoothing before primer. Coarser abrasives can save time on hardened edges, but they also expose paper quickly. I learned this after rushing a ceiling repair. The patch looked flat, yet strong side lighting revealed circular scratches.
Pad shape and backing matter too. A rigid pad suits broad walls and keeps pressure even. A flexible pad follows inside corners and curved repairs. Open-mesh designs clear dust more effectively than solid sheets, especially during long sanding sessions. However, mesh ratings vary between manufacturers. Do not trust grit numbers blindly. Test a small area first.
Dust control is part of pad selection. OSHA’s Respirable Crystalline Silica Standard sets a 50 micrograms-per-cubic-meter limit over an eight-hour workday, with a 25 microgram action level. Drywall compound is not always highly siliceous, but additives and surrounding materials can change exposure. Use local vacuum extraction, eye protection, and a suitable respirator when dust accumulates. A 2023 U.S. Bureau of Labor Statistics report recorded 2.6 million nonfatal workplace injuries in private industry, reminding us that routine work still needs discipline. I sometimes choose a slightly slower pad now. Fewer scratches, less cleanup, and a better surface usually justify the extra minutes.
2026 Top Drywall Sanding Pads Buying Guide
What Features Should You Compare Before Buying Drywall Sanding Pads?
Choosing drywall sanding pads requires more than checking the grit number. In professional finishing work, I compare grit consistency, backing strength, pad size, and attachment quality. Coarse grits remove ridges quickly, while fine grits smooth joint compound before painting. A flexible pad follows shallow curves, but an overly soft pad can leave uneven spots. Rigid pads work well on flat seams. They can feel harsh around corners.
Dust control also deserves careful attention. Look for open mesh or perforated designs that connect properly with a vacuum system. Poor airflow can clog the abrasive and scatter fine powder across the room. The backing should resist tearing after repeated folding or hand pressure. I have occasionally chosen a pad by grit alone, and that was a mistake. Surface condition matters more than a convenient label.
Tips: Match the pad to the compound’s hardness. Check the pad against a clean sanding block before use. If dust builds quickly, stop and inspect the holes. Keep a medium and fine grit nearby, because one pad rarely handles every stage. Also compare replacement cost, washable construction, edge durability, and comfortable grip. A slightly larger pad may cover seams faster, but it can reduce control near outlets and trim. Test a small area first. The wall may respond differently than expected.
Compare the typical abrasive grit ranges used at each drywall finishing stage before choosing a sanding pad.
Choose coarser grits for removing ridges and excess joint compound, medium grits for smoothing, and finer grits for final surface preparation. Before buying, also compare the pad’s backing stiffness, dust-extraction holes, mesh construction, size, wet/dry compatibility, and attachment system.
Choose a pad that matches the compound’s hardness and your sanding tool. Fine-grit pads smooth final coats, while medium grits remove ridges faster. Press lightly and move in overlapping circles. Heavy pressure can create shallow waves and shorten pad life. Keep the pad flat against the wall. Corners need controlled hand sanding, not aggressive scraping. I have found that a quick vacuum between passes prevents old dust from scratching fresh compound.
Clean reusable pads outdoors or in a ventilated area. Tap off loose dust, then rinse washable pads with clean water. Do not twist them sharply. That can distort the abrasive surface. Let pads dry completely before storage. OSHA’s construction silica standard sets a permissible exposure limit of 50 micrograms per cubic meter over eight hours. Use local exhaust, a suitable respirator, and a vacuum designed for fine dust. Check the compound’s safety data sheet because formulations differ.
Store dry pads flat in a sealed container, away from sunlight and wet tools. Replace a pad when its surface feels smooth, loads with compound, tears, or leaves uneven scratches. A simple test helps: sand a small hidden area and inspect it under side lighting. NIOSH identifies respirable crystalline silica as a serious occupational hazard, so visible dust is not a harmless quality issue. My imperfect habit is replacing pads too late. Tracking usage by room would be wiser.