Top 10 Uses for an Oscillating Tool You Need to Know?
The oscillating tool is a game changer in the world of DIY and professional projects. According to John Smith, a renowned expert in the tool industry, "An oscillating tool can transform the way you approach home improvement tasks." This versatile device offers unique capabilities that go beyond traditional tools. From cutting to sanding, its applications are numerous and exciting.
Many users find the oscillating tool invaluable for intricate tasks. For instance, precision sanding in tight corners is often a challenge with other tools. However, an oscillating tool can make this task much easier. Its ability to work in tight spaces allows for a level of detail that larger tools simply cannot achieve.
Yet, some users overlook its full potential. Many stick to just a couple of uses, missing out on its versatility. This can lead to frustration in projects that require diverse functions. Embracing the oscillating tool fully can make a significant difference in efficiency and craftsmanship. Exploring its top ten uses reveals a world of possibilities waiting to be discovered.
Exploring the Versatility of Oscillating Tools in Home Improvement
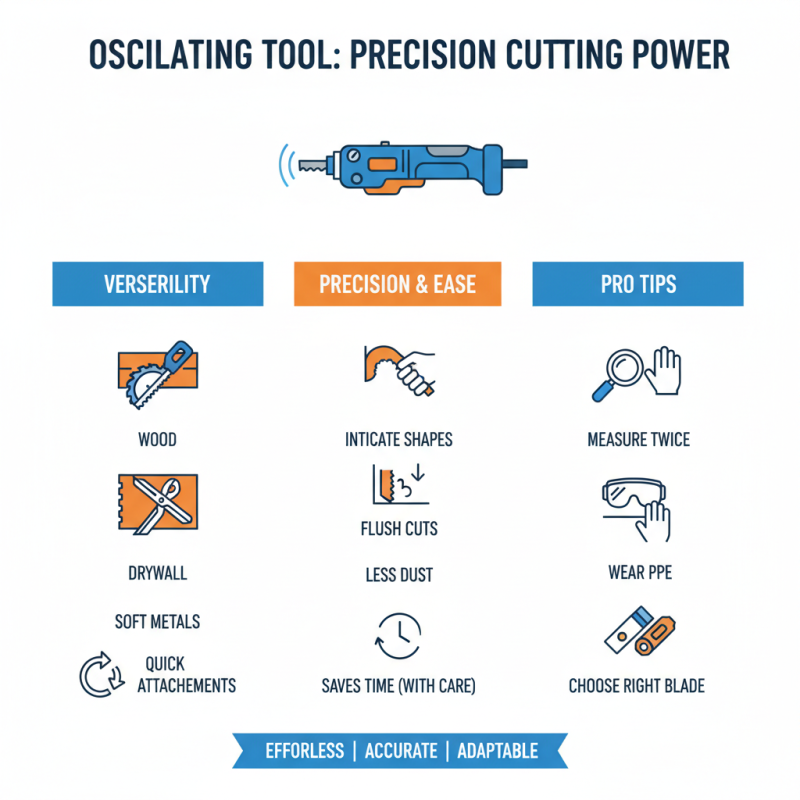
Oscillating tools are a game changer for home improvement. Their design allows for various attachments, making them incredibly versatile. You can use them for cutting, sanding, and scraping. This multifunctionality means fewer tools cluttering your workspace. Imagine easily switching from sandpaper to a blade. It saves time and energy.
Consider a home renovation project. You might need to trim door frames or install hardwood flooring. An oscillating tool can make precise cuts without damaging surrounding materials. This precision can lead to a more polished outcome. However, it's easy to underestimate this tool's power. Overusing it can lead to wear and tear. You may find yourself replacing attachments more frequently than expected.
Also, using this tool requires technique. Holding it at the wrong angle can result in uneven surfaces. It's frustrating to realize, especially after hours of work. There is a learning curve. But once you master it, the possibilities expand. From detailed crafts to major renovations, this tool opens doors to creativity in your home projects.
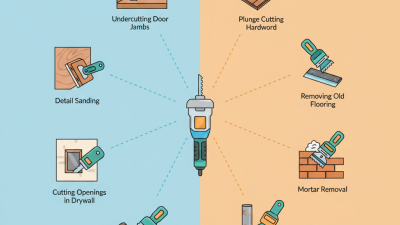
Top 10 Uses for an Oscillating Tool
Cutting Tasks: How to Make Precise Cuts with an Oscillating Tool
An oscillating tool can make your cutting tasks easier and more precise. This handy tool excels at making intricate cuts in various materials. Whether you’re dealing with wood, drywall, or even metal, the right attachment makes a difference. Focus on the project and take your time. Rushing can lead to mistakes.
Tips: Always mark your cutting line clearly. A fresh blade ensures a clean cut. For tight spaces, use a smaller blade attachment. Holding the tool at a comfortable angle gives you better control. Remember, practice makes perfect. You might not get it right on the first try.
Precision is key, but mistakes happen. An accidental slip can ruin your work. It’s essential to measure multiple times before making a cut. Adjust your grip if you feel uneasy. An oscillating tool can be a game-changer, but it takes practice to master. Stay patient and keep experimenting with different techniques.
Sanding and Finishing: Achieving Smooth Surfaces Effortlessly
Sanding and finishing are crucial processes in woodworking. An oscillating tool can make these tasks easier. With the right attachments, it can effortlessly smooth surfaces. This versatility is what attracts many DIY enthusiasts.
When sanding, consider using a finer grit attachment for delicate work. It allows for precision without damaging the surface. Many people struggle to achieve that perfect finish. They often overlook the importance of technique. Slow, steady movements yield better results. Rushing can lead to uneven spots or scratches.
Finishing touches, like polishing, can elevate your project. An oscillating tool helps you apply finishes evenly. However, not all finishes are compatible. Always test on a scrap piece first. Awkward angles may pose a challenge; adjusting your grip can help. Even experienced users face bumps along the way. Embracing imperfections can lead to learning and improvement.
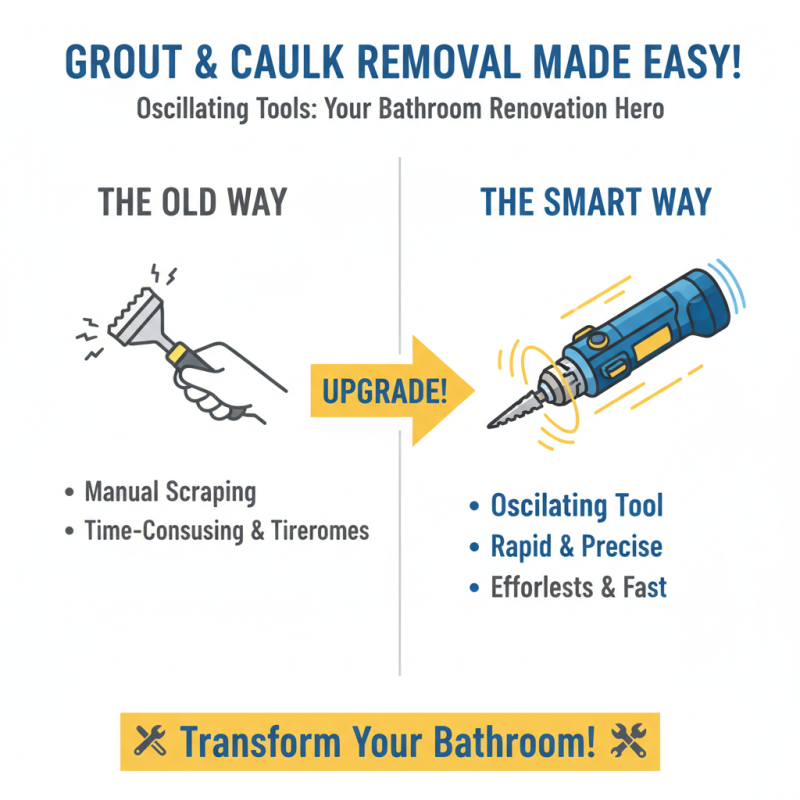
Removing Grout and Caulk: Efficient Techniques for Bathroom Upgrades
Removing grout and caulk can be a daunting task. However, using oscillating tools makes it much easier. These tools are versatile and effective, especially when upgrading your bathroom. The blade oscillates rapidly, allowing you to slice through old grout and caulk with precision. This efficiency saves time and effort compared to manual scraping.
Start by selecting the right blade for your oscillating tool. A fine-toothed blade works well for grout. For caulk, a wider blade may be more effective. Make sure to control the tool carefully. It's easy to accidentally scratch the tiles if you're not paying attention. Lighting is also crucial. Poor lighting can lead to mistakes and damage to your surfaces.
After removing the old grout, inspect the area closely. Sometimes there are small remnants left behind. It's important to ensure a clean surface before applying new grout or caulk. This diligence prevents future issues. Even seasoned DIYers can struggle with this task. It's okay to take breaks and come back with a fresh perspective. Each bathroom upgrade can teach us something new, even if we don't get it right the first time.
Plunge Cuts: Mastering the Art of Creating Access Points in Wood
Plunge cuts are a valuable technique when using an oscillating tool. This method allows you to create access points in wood without the need for a full cut. It is especially useful for making precise cuts in tight spaces. When executing a plunge cut, ensure you work slowly and steadily. Rushing can lead to mistakes and ruin your project.
Begin by marking your cut clearly on the wood surface. A simple pencil line will help guide your tool. Position the oscillating tool at the marked point, keeping your hand steady. Apply gentle pressure as you engage the blade. The key is to let the tool do the work. If you force it, you might end up with splintered wood or an uneven cut.
It's normal to feel a bit uncertain at first. Practice on scrap wood before attempting your main project. You might need to adjust your technique after a few tries. Imperfections will happen, and that’s part of the learning process. Embrace the flaws; they can be valuable lessons in your woodworking journey.